
HAPPY NEW YEAR!
For the past few years, I have counted down to the new year with a top ten list. I begin on 12/23 and end on 1/1. The list is comprised of 10 tech tools or tips for elementary and middle school general music. This top ten list will have a tech tool or tip featured each day in a short video and blog post. When we reach number one, I will follow it with a video of all ten tools and tips. Therefore, you can follow me daily, or come back on New Year’s Day and catch all ten at once.
WHO AM I?
If you are new to this YouTube channel or my website or my buymeacoffee site, my name is Amy M. Burns and I have been teaching and integrating technology into the elementary music classroom for over 25 years at Far Hills Country Day School, a preschool through grade 8 private school in NJ. For the past two years, I have also worked for Katie Wardrobe in her Midnight Music Community as the Community Coordinator answering questions and giving out tech tips to the community. Finally, I am an author and clinician with four publications. My recent publication titled Using Technology with Elementary Music Approaches is published by Oxford University Press and can be purchased from OUP or Amazon today.
Each week on this website and my YouTube channel I post a play-along video, resource video, or a webisode about integrating technology into the music classroom. Please subscribe and click like to the video so that you can get weekly notifications about resources you can immediately use in your classroom. I am also working on my Teachers Pay Teachers page, but currently, it holds many free items. I hope to get that going more in 2023. If you like my resources, please consider buying me a coffee at https://www.buymeacoffee.com/elmusedtech
#1 Creating a Play-Along Video with Free Tools!
Happy New Year! I hope that you were able to choose how you wanted to ring in the new year and rang it in with style!
The final tech tool is another free tool and it can be used to create play-along videos. You need three items to do this:
From Tech Tip #6 Katie Wardrobe’s Midnight Music’s Big Free Music Notation Library COMPLETE 2022!
From Tech Tip #5 Canva for Education program
From Tech Tip #1 Clipchamp
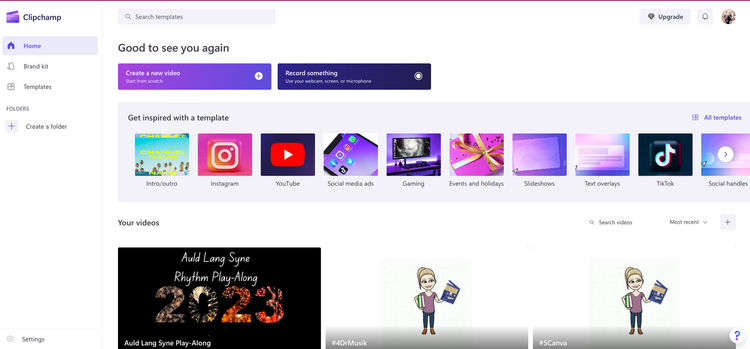
What is Clipchamp?
Clipchamp is a video editing tool, that is also a part of Microsoft 365, that can be run on any desktop or laptop device including Chromebooks. Currently, Clipchamp is not optimized for touch-screen devices like iPads or tablets, but it does have an iOS app. It runs on web browsers such as Chrome and Chromium browsers like Microsoft Edge.
Clipchamp is similar to WeVideo, however, the free version does more than WeVideo. Clipchamp’s free plan lets you work on as many videos as you like. You can use your own video files, audio files, and images, as well as the ones included in their program from Giphy, Stickers, Stock Images, Stock Videos, SFX, Music, and more. It also includes basic editing tools. You can also export completed projects in up to 1080p (full HD) resolution for free.
What is the difference between paid and free plans?
With the paid plan, you can access premium audio, image, and video stock, as well as the free stock. This is also true for the filters and effects. With the paid version you can create a brand and logo for your videos. Finally, with the paid version you can place the content you bring into the video, such as notation graphics or graphics you created in Canva, in their Cloud. In the free version, you have to keep importing the graphics, pictures, audio files, video files, etc, you are using every time you create a new video.
How Do I Use These Free Tools to Create My Own Play-Along Videos?
Here is a step-by-step guide that is shown in this webisode:
Choose your music. The music you choose might be based on certain rhythmic values or patterns, a tempo, a holiday, a composer or performer, or other musical items that you are teaching your students.
As stated in tech tool video #5, I tend to choose ones I can credit on YouTube, purchase on iTunes, or create myself. Usually, a copyrighted song on YouTube will allow it to be used as long as they can run ads off your channel. They will inform you of that. Sometimes, the song is banned in certain countries. You can still use the recording, but not all countries will be able to use your video. Finally, if it is not allowed to be used, your video will be blocked, but it will usually not be a strike against your channel. Remember, you do not have to show your video on a YouTube channel. You could add it to your Drive and share it from there. Or create a Google Site to host the videos. But a YouTube channel gives it options like keeping the videos private, placing them in playlists, and more to keep them organized.
For this example, I am using 50 seconds of Yo-Yo Ma playing Auld Lang Syne so that I can run the credits. I am then having the Learning Guitar’s version play for the rhythm play-along. There are four phrases of 8-measures. I broke it down to:
Phrase 1: four quarter notes
Phrase 2: four eighth notes followed by two quarter notes
Phrase 3: Dotted quarter note followed by one eighth note, followed by two quarter notes
Phrase 4: Dance Break is my bitmoji dancing. Since Canva integrates with Bitmoji, I can search out all of the dancing bitmojis and place them on various slides.
Create the slides. This is where the free version of Canva comes in. As I showed in tech tool video #5, you can find your videos and images for the play-along video in Canva. You can overlay Katie Wardrobe’s Midnight Music’s Big Free Music Notation Library COMPLETE 2022! to create the rhythm patterns.
Export the slides. If the slides are pictures, export them as .png files. If they are videos, export each individual video as an mp4 file.
Open Clipchamp and click on “Create a New Video.”
In the “Your Media” tab, click and drag the video and picture files so they upload to that tab. Also, upload the audio file.
Place the audio file onto the timeline. If you need to adjust the volume, click on the audio file in the timeline so it is surrounded by a green line and go to the tools on the right-hand side. Click on “Audio” and adjust the volume with the slider.
I created three videos to play while I run the credits of the play-along video. I bring them over from the ”Your media” tab by clicking and dragging them onto the timeline.
If the videos are too long for the audio file, I can adjust the speed of the video by clicking on the video and then clicking on the “Speed” tool on the right-hand side of the screen. You can now adjust the speed of the video to fit the music.
I will now bring in the rhythm-pattern slides from the “Your Media” tab. I will adjust them to fit the music so that the slide changes on the downbeat.
If the music has strong downbeats, you can use the + tool to magnify the timeline and see the bigger wavelength on the strong downbeat. This will help you place the slide in the correct place.
Once I have the slides in place, I will add the conductor. A conductor can be a rectangle, an item related to the music (like a snowball if you were creating a play-along to Let It Snow), or anything you choose. For this song, I am choosing a party hat, a noisemaker, and a disco ball.
To find the conductor, Clipchamp has libraries similar to Canva! Some of the items are only for the premium plan, so I stay away from anything with the gold diamond symbol. Many of the Stock Images are for the premium plan, but you can still find blocks with various colors and some items free to use in the Stock Images.
Therefore, I go to the “Graphics” tab on the left-hand side and search there. There are Stickers, Giphy, Shapes, Annotations, and many more items found there with many of them being free.
I looked at Stickers and placed “party hat” in the search tool. I picked a blue checkered hat to be the conductor for the first phrase.
Making the Conductor Move to the Rhythm Pattern
This is probably the trickiest part that takes some practice to do.
I magnify the timeline with the + tool so I can see the downbeats easier in the audio file.
Place the cursor on the first beat for the conductor.
Drag the hat to the cursor.
The hat is now on the screen and probably too large.
Use the resize tools to adjust the size of the picture.
Click and drag the picture so it is over the first quarter note.
Find the second beat and place the timeline cursor over it.
Copy and paste the first conductor on the timeline.
Though you will paste it where the cursor is, I find that Clipchamp will only place it next to the other image you copied. Therefore, you will have to move it to the second beat.
Do the same for beats three and four.
Tip: I do not like to have gaps between the conductors, so I will extend the image so that there are no gaps. This makes the conductor move instead of blinking, which some students cannot watch constantly blinking items on a screen.
Once all four beats are finished, you can copy the four conductors and paste them on top of the next slide. You will probably have to adjust, but use the audio file and the magnifying tool to assist you with this.
Layering
Your timeline now has layers. The bottom layer is the audio file, the middle layer is the slide and the top layer is the conductor. Whenever you work with a video editor, you will be layering items and the one of the bottom is the background and everything layers in order of bottom to top.
Phrases 2 and 3
Phrases 2 and 3 and can be done like phrase 1. You can choose different conductors for each phrase like you can choose different background slides in Canva. This helps the students visualize the different phrases.
Dance Break
I love adding dance breaks in my play-along videos. With the slides you created in Canva that had your dancing bitmojis, bring them to your timeline for phrase 4. I like to have the slides change every beat, so I will adjust the slide’s length by clicking and dragging the end of the slide. Therefore, the slides will probably repeat and that will be fine.
Final Credit Scene
I usually leave a few seconds at the end of the video for a plug for my YouTube channel and my buymeacoffee site. I then fade out the video by clicking on the final slide and going to the tools on the right-hand side. I click on fade and move the fade-out slider to the middle or further so the last slide will fade out.
Transitions
If you want to add transitions, Clipchamp has many of them on the left-hand side. Some are only for the premium plan, but you will find many for the free plan. Choose a transition, drag it to the timeline, find the green + that appears, and place it on the green +. If the + sign changes, then the transition has been placed on the timeline.
Export
To export your video, you can click the purple “Export” button on the top right-hand corner of the screen. Scroll down to 1080p HD for video streaming & presentations. Once your export is complete (it will take a few minutes), it will download to your hard drive. But, you can also create a link or share your video to Google Drive, Upload to YouTube, Send to TikTok, Save to OneDrive, Save to Dropbox, Pin to Pinterest, or Share to Linkedin.
Some Additional Tips
Clipchamp, I believe, can only record up to 30 minutes of video.
Clipchamp can do a lot more than what I showed you in this video. I encourage you to set up a free account and try it today!
Are there other ways to create Play-Along Videos with Free Tools?
Yes! You could create a PowerPoint or Keynote slide show with each slide having the conductor on it, add the soundtrack to the presentation, and screen record yourself with Loom or Screencastify (depending on the length of the song) by clicking through the slide show in time with the music.
As with many things with technology, there are multiple ways to do one thing. I just recently discovered Clipchamp and I am so impressed with what its free plan can do in a web-based platform.
Happy 2023!
I hope that the new year brings you peace, health, and lots of joy. Please check out my YouTube channel weekly for tech tips, play-along videos, monthly Wakelets, and more! Feel free to buy me a coffee and hopefully, soon, my TPT channel will have items for purchase (that is my New Years’ resolution)!
I hope that the new year brings you peace, health, and lots of joy. Please check out my YouTube channel weekly for tech tips, play-along videos, monthly Wakelets, and more! Feel free to buy me a coffee and hopefully, soon, my TPT channel will have items for purchase (that is my New Years’ resolution)!