
WireGuard is communication protocol which uses state-of-art cryptography to implement Virtual Private Network (VPN). This is free and Open-Source.
We will see how we can setup our private VPN server.
Server provisioned with AWS Free Tier or Oracle Cloud’s Always free options may even help you setup a secure VPN with no cost.
Why VPN ?
In current time of pandemics, When we are working from home, data security is utmost important to organisations. Accessing organisation resources like servers, database, confidential files and other sensistive information with open internet can be riskier and can be an oppurtunities for security offenders to perform man-in-middle attack to leak the informations.
With shared Wi-Fi network, sites, information and data can be monitored.
ISPs like to monitor you when you are playing your favorite songs, or reading articles or browsing internet.
You may need to open apps or visit websites which are geologically restricted.
All of the above scenario can be achieved by a secure VPN. This gives you privacy, protects you from third-party interruptions and allows you to access geologically restricted apps and websites.
Though VPN is not banned in India. Illegal activities using VPN is still a punishable offence and can land you in trouble. You must use VPN wisely.
Why WireGuard ?
WireGuard is modern VPN which is faster, simpler to configure and easiest to use. WireGuard is new and lots are developments are still in way. But has already achieved the most secure tag and simplest VPN.
WireGuard is built with very few lines of code. hence, security audit of code-base is easier and provides minimum surface of attacks.
WireGuard is faster, more secure and less prone to attacks as compared to widely used OpenVPN.
Pre-requisite
Ubuntu 20.04 server on AWS or any other cloud with root access. Preferably in region where you want VPN to tunnel through.
Firewall or Security Group of server allowing UDP port 50409 inbound/ingress rule.
A client e.g. Mobile Device or A Laptop
WireGuard VPN server setup
All the credentials, tokens, keys and public ips used in this article are temporary and will be destroyed before publishing.
Switch to root user
sudo suInstall WireGuard packages and dependencies.
apt update && apt install -y wireguard iptables resolvconf qrencode
Generate server’s private key and public keys. Never share PRIVATE KEY with anyone.
wg genkey | tee /etc/wireguard/privatekey | wg pubkey | tee /etc/wireguard/publickeyCreate WireGuard configuration file.
vi /etc/wireguard/wg0.conf
Add below content in the file.
[Interface]
Address = 10.66.66.1/24,fd42:42:42::1/64
ListenPort = 50409
PrivateKey = <SERVER_PRIVATE_KEY>
PostUp = iptables -A FORWARD -i <SERVER_PUB_NIC> -o wg0 -j ACCEPT; iptables -A FORWARD -i wg0 -j ACCEPT; iptables -t nat -A POSTROUTING -o <SERVER_PUB_NIC> -j MASQUERADE; ip6tables -A FORWARD -i wg0 -j ACCEPT; ip6tables -t nat -A POSTROUTING -o <SERVER_PUB_NIC> -j MASQUERADE
PostDown = iptables -D FORWARD -i <SERVER_PUB_NIC> -o wg0 -j ACCEPT; iptables -D FORWARD -i wg0 -j ACCEPT; iptables -t nat -D POSTROUTING -o <SERVER_PUB_NIC> -j MASQUERADE; ip6tables -D FORWARD -i wg0 -j ACCEPT; ip6tables -t nat -D POSTROUTING -o <SERVER_PUB_NIC> -j MASQUERADE
Replace few values in the file as per below:
<SERVERPRIVATEKEY> must be replaced by PRIVATE KEY generated. It can be retrieved with below command.
cat /etc/wireguard/privatekey
<SERVERPUBNIC> must be replaced with network interface name of your server. This can be retrieved with below command. e.g.
ip -o -4 route show to default | awk '{print $5}'
Keep Address and ListenPort as it is. Address is CIDR of WireGuard network interface. ListenPort is the UDP port on which WireGuard will listen to traffics.

Enable routing on server
echo "net.ipv4.ip_forward = 1" > /etc/sysctl.d/wg.confecho "net.ipv6.conf.all.forwarding = 1" >> /etc/sysctl.d/wg.confsysctl --system
Start WireGuard service
systemctl start "wg-quick@wg0"systemctl enable "wg-quick@wg0"WireGuard VPN Client Configuration
Run the below steps on server:
Generate client’s private and public key. Never share PRIVATE KEY with anyone.
wg genkey | tee /etc/wireguard/clientprivatekey1 | wg pubkey | tee /etc/wireguard/clientpublickey1wg genpsk | tee /etc/wireguard/presharedkey1
Create Client Configuration File
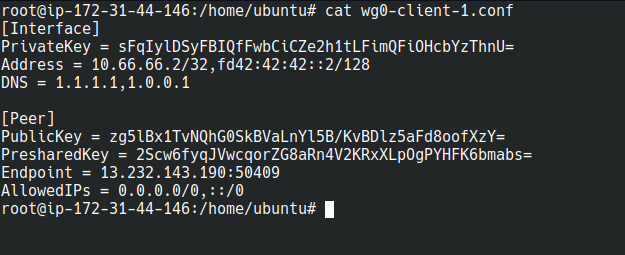
vi wg0-client-1.conf
Add below content in file:
[Interface]
PrivateKey = <CLIENT_PRIV_KEY>
Address = 10.66.66.2/32,fd42:42:42::2/128
DNS = 1.1.1.1,1.0.0.1

[Peer]
PublicKey = <SERVER_PUB_KEY>
PresharedKey = <CLIENT_PRE_SHARED_KEY>
Endpoint = <ENDPOINT>
AllowedIPs = 0.0.0.0/0,::/0
Replace few values in file as per below:
<CLIENTPRIVKEY> must be replaced with generated private key of client. This can be retrieved with below command.
cat /etc/wireguard/clientprivatekey1
<SERVERPUBKEY> must be replaced with generated public key of server. This can be retrieved with below command.
cat /etc/wireguard/publickey
<CLIENTPRESHARED_KEY> must be replaced with generated preshared key. This can be retrieved with below command.
cat /etc/wireguard/presharedkey1
<ENDPOINT> must be replaced with PUBLIC_IP:50409. e.g. 13.232.143.190:50409 . If your server’s public IP is dynamic and you are using DDNS, Its better to use domain which points to Public IP of your server. e.g. wireguard.example.com:50409
Leave other configurations as it is. Address is WireGuard ‘s client IP. This should be unique for each client. DNS is DNS resolver IP, 1.1.1.1 and 1.0.0.1 is IP for CloudFlare DNS resolver.
Update the server configuration
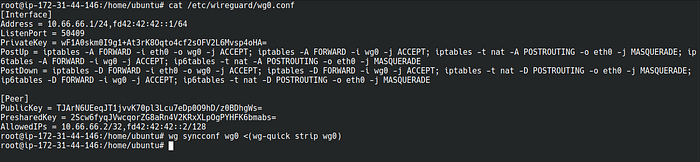
vi /etc/wireguard/wg0.conf
Append below lines in the file. This will add new client as a peer.
[Peer]
PublicKey = <CLIENT_PUB_KEY>
PresharedKey = <CLIENT_PRE_SHARED_KEY>
AllowedIPs = 10.66.66.2/32,fd42:42:42::2/128
Replace few lines from file as below:
<CLIENTPUBKEY> must be replaced with public key of client. This can be retrieved using below command.
cat /etc/wireguard/clientpublickey1
<CLIENTPRESHARED_KEY> must be replaced with preshared key. This can be retrieved with below command.
cat /etc/wireguard/presharedkey1
Keep other values as it is.
Update the server with updated configuration
wg syncconf wg0 <(wg-quick strip wg0)
Generate QR code of client configuration.
qrencode -t ansiutf8 -l L < wg0-client-1.conf
You can also create image file of QR code and download it for later use.
qrencode -t ansiutf8 -l L -o wg0-client-1.png < wg0-client-1.conf
Connect to VPN
Android/iOS:
Install WireGuard app from respective app stores.
Click on add(plus) icon in the app and scan the QR code which is generated in server.
Toggle to Connect and disconnect.
Linux/Mac PC:
Download
wg0-client-1.conffile to your PC using SFTP or SCP utility. (Always use secured way of file transfer)Install wireguard on your PC as instructed here → https://wireguard.com/install/
Copy the client file to /etc/wireguard directory. Use below command on PC.
sudo cp wg0-client-1.conf /etc/wireguard/wg0.conf
Connect to VPN with below command
sudo wg-quick up wg0
Check if you are connected with below command.
sudo wg
To disconnect use below command.
sudo wg-quick down wg0
Windows PC:
Download
wg0-client-1.conffile to your PC using SFTP or WinSCP utility. (Always use secured way of file transfer)Download and install WireGuard client for Windows as instructed here → https://wireguard.com/install/
Add Tunnel → Import Tunnel from file → Choose Downloaded file → Connect
After connecting to VPN. You can verify your IP address by visiting https://whatismyipaddress.com . This should show Public IP address and location/region of your VPN server instead of your ISP.
You can add multiple clients using WireGuard VPN Client Configuration with different client configuration.
Linux Shots