This tutorial was first published in 2013. I have fine tuned my techniques substantially since then which I will get to in a future post.
Today I'd like to guide you trough the process of making a bespoke accordion portfolio book, using standard 4x6 inch prints. The example here will be of double page spreads at 8x6 but yours doesn't have to be. You could make this project using 5x7 prints for a 10 by 7 spread, for example.
Sequencing
Firstly, you need to settle on a project, which in my case is a new portfolio for 2013 consisting of old and new work, sequenced together for an off kilter and hopefully poetic flow.
When you've got your project you will need to work on the sequence from start to finish. There's no point in editing and sequencing while you're in the process of constructing the thing. Sometimes I'll sequence photos in my head but much of the time I'll need to do it manually, either by placing prints out on the floor and moving them around or doing the same thing using thumbnails in Aperture or similar software. On a Mac you could just use the finder window and click and drag your images into sequence.
When you've settled on your sequence, you then start to prepare the files. You could open all the files in Photoshop and use an action to resize them or batch export from Aperture or Lightroom to a specific project folder. I'd suggest using an sRGB colour space as this is standard in most high street labs. You'll need all files to be at 8 inches on the longest side at 300 dpi. Or you could just process each file individually as you progress through the book, but it can get repetitive. At least you'll be able to take a break without worrying about where in the process you were when you return. This may be the best approach to take if you're not expecting to complete the task in one sitting and if you make a mistake there will be less damage than if you had been using a batch process action and the error was made to multiple images. I've done this and an outburst of expletives will do you no favours with those around you.
I find that with good music playing I'm perfectly happy to work on each image from start to finish and I enjoy the feeling of gradual progress and knowing exactly where I am in the process.
So I will describe the process of preparing an image right the way through and will not demonstrate the batch action. You can work the actions out for yourself depending on how you want to break it down.
Here goes. I'm using Photoshop CS on a Mac.
Preparing the images
1. Open Photoshop. Go to Preferences and select an sRGB setting as your working colour space.
2. Go to File and scroll to Open - your first image, ? and O keys together on a Mac. Make sure you are working with a TIFF or Photoshop file. Not a jpeg. If you opened a jpeg file, save it immediately as a TIFF file before making any adjustments. If there is a colour space conflict, simply select convert to working when in the warning window.

3. When in Photoshop and working on single images, I always use the grey screen which keeps the working area tidy. I use mainly the options, tools and layers windows which you?ll find by scrolling down through the Window menu. You can toggle between the various background settings by hitting the F key. You can also toggle between clear screen with just the image and the full screen with the various windows by hitting the TAB key. So give those keys a try to get a feel for it.

4. It's always a good idea to enter some specific file info so that images are easy to find in a search later on. You should also always enter some © information. The © symbol on a Mac is achieved by hitting option and G keys together, on a PC hold down ALT and type 0169. Go to File and scroll to File Info or hit the ? and I keys together.
5. Before setting file dimensions, you should hit ? and R keys together to set the rulers (Shift+Ctrl+R on a PC). These will come in very handy as we lay out the double page spread later on. Now go to Image, then Image Size and open window.

Hopefully the image will be at 300 pixel/inch. If not, deselect Resample Image and enter 300 then reselect.

Then enter 8 inches in the Document Size box for the longest side assuming that you are working from full size originals bigger than 8x6 inches. Do not size up, that?s a whole different tutorial. Most images from DSLR and M43 cameras these days are at least 10x7 with most current models at about 13x9 at 300 dpi or thereabouts. (Please note that dpi and ppi are really the same thing for this project. I may switch between the two.)
Now it starts to get interesting. And tricky.
6. Open a new file. Go to File then New or ?N. It should open with the rulers already in place. Set width at 8 inchs and height at 6 inches. Set RGB Color, 8 bit and make sure the Background Contents is set to white or whatever colour you want. I?m going for white as usual. See image below. No need to name it as it?ll be a canvas and will be named and saved later in two separate files.

In order to see both open files, you should click the F key until both images are visible. Set guidelines by clicking on the new blank image and click and drag from the side ruler to the middle at 4 inches. Do the same from the top ruler to the 3 inch mark.

7. Select the photo by clicking on it. Select the move icon or hit the V key. Click and drag the photo onto the blank canvas and centre it using the guides. It'll likely snap to guides.
Once you?ve done that you can delete the photo as you'll no longer need it. I wouldn't bother saving changes to it.
8. At this point, if you are using a four thirds or micro four thirds camera, you?ll notice that the image fills the canvas so if you are starting out with such a camera, you?ll not need the blank canvas stage if the image is a perfect split down the middle. However, if the image is not symmetrical, you?ll want to adjust it?s position so that the gutter down the middle will not spoil the image's power. The best way to explain this is to show an example.
Before I split this image into the left and right pages, I will nudge the image up just slightly so that the border on the bottom is slightly larger just as I would when framing for an exhibition. The same rules apply.

Since we are already using the move tool, (V key) I simply use the up arrow and click about 4 times or whatever is pleasing to your eye with your image. In order to best judge, you could toggle back to the grey screen by click F once or twice. Also keep in mind that you can toggle viewing size too by clicking whatever applies of either ?0 (fills screen) ?+ or ?- to zoom or Option?0 for actual pixel size.
9. Before we split into pages, let me address positioning. The image above splits down the middle perfectly. However, were the image to be balanced differently, we may prefer to position the photo on the canvas more effectively before creating the page gutter down the middle.

For example, this ice cream shot would be ruined, in my opinion, were it to be chopped through. So let's move it a bit. This is where you need to put your book designer hat on. You need to use the Free Transform facility in the Edit menu or simply click ?T. This will select the photo as it's a separate layer still.
Grab a corner and move the image until you are happy with its position. Remember to hold the shift key while adjusting the size to hold shape and maintain proportions. I?ll stick the ice cream image to the edge of the right hand page so that there's a border on three sides. I like the tension it creates.

10. It?s now time to prepare the left and right pages. You may think up a better method than mine but this works fine for me.

When you?re happy with the positioning, go to Layer and Flatten Image. Then hit the C key for the crop tool and select the right side as above then hit return key. (You can do this with using the crop tool from the tool window if you?d prefer.)
Next we set a small guide line to help with trimming when the prints come back from the lab. This is an important step so that the pages line up correctly when it's time to assemble. Using the keyboard shortcuts again, select all by hitting ?A. Then go to Edit and scroll down to Stroke. Enter 1px and whatever colour you want your trim line to be making sure to highlight select Inside (as per illustration). When that?s done simply hit ?D to deselect.

11. When you've done that you need to create a border to ensure that the lab prints the full area. This is for uniformity and safety so that all the pages match up properly. When the prints come back you'll better understand this step.
Go to Image and scroll to Canvas Size. Then increase the canvas size by 102 percent for both width and height. (Use the tab key to toggle.) Click OK or hit return key.

When you?ve done that you need to return the image to 4x6 inches which is easy. Go to Image and scroll to Image Size and enter either 1200 pixels or 4 inches (same thing) for the width and the rest will follow. I also select Bicubic Sharper at this stage but it?s not important.

Then save the page twice, first as your master .TIFF copy making sure to label it the right side, for example “descendinghillr.tiff (where the other page will be “descendinghilll.tiff). Once you've saved it as a .tiff, save it as a jpeg at 10 or 12, whatever the maximum is for your software version.

12. When you've done all that go into your History window and go back to Flatten or wherever you were just before you cropped. This should bring up the full double page canvas. Then go through the same procedure but for the left hand page (jump back to step 10).
Printing
13. When you have worked your way through all your pages, simply send the jpegs to your lab via email or FTP or online upload or pop them on a memory card and upload them at the lab yourself. Make sure to tell the lab to print the 4x6 files as prepped. If you're printing at home, just make sure the full canvas is printed so the visible guidelines are included. I prefer to print on matte paper. Glossy doesn't look right in a book, I don't think. But that's just my taste preference. Perhaps some projects would look better printed on glossy, maybe I'll try it sometime.
Assembly

14. It?s time to trim and assemble. I use a stanley knife but any designer?s scalpel will work very well. I've always preferred the bulky stanley knife. I also use an A4 self healing cutting board. You could use a clean chopping board from the kitchen as well.
The other tool I find invaluable is a bone folder for creasing and flattening. You could use a spoon or similar smooth object for this purpose.

Trim the photos along the inside of the thin guidelines that hopefully will have survived the printing stage.
Then you need to make the double page spreads. When you tape them you need to leave a small gap between the pages so that they will fold together properly. About 2mm should be perfect. When you add the spreads together, however, they will need to be completely flush as they will fold out.

So spread gutter needs 2mm and spread to spread needs to be flush. That?s all there is to it. So get all the spreads done first.
You could use a ruler to line everything up but it'll make you crazy. You?re better off doing it by eye. Put tape down, sticky side up. It's tricky to do but you?ll figure out a way. Then line up one side and slightly stick down. Then add the other side with 1-2mm gap lining up carefully by eye. Then trim off the excess tape top and bottom, flip over and use bone folder or spoon to smooth out from centre and fix tight.

I use acid free paper parcel tape. A good stationers will have it. Masking tape is not strong enough. Book binding tape is perfect too but pricey.
When all the spreads are done you?ll need to add them together, taping them in sequence to form one long strip of photo spreads before folding them back on each other like an accordion. Remember to make sure the pages are completely flush when you add them.

15. When the content is assembled, you?ll need to add a cover. For this project I will use a simple black card cover. You could prepare a more traditional cover as well.

Cut two pieces of card to 4x6 and tape them as before to both ends of your book. Then cut another two pieces of card at about 3.8x10 inches. Fold back two flaps, one at the top and one at the bottom of the 3.8x10 cards so that the 4x6 card will fit neatly inside - so the folds should sit slightly wider than 6 inches.
Then cut two more at 6x6 folding left and right flaps this time so they fit snugly over the 3.8 by 10 inch card.

On the left is the folded 6x6 card, on the right is the 3.8x10 card with flaps folded down.
Then slot these two pieces together as per the illustration below:

Slide the 4x6 black card that is taped to the book body into the cover:

Do the same for the back of the book and you're done. This portfolio has a black cover and white pages. I will make another with a white cover with my logo on it so that I have brand continuity with my website. You can keep an eye on my Blog or Twitter to see how it turns out.
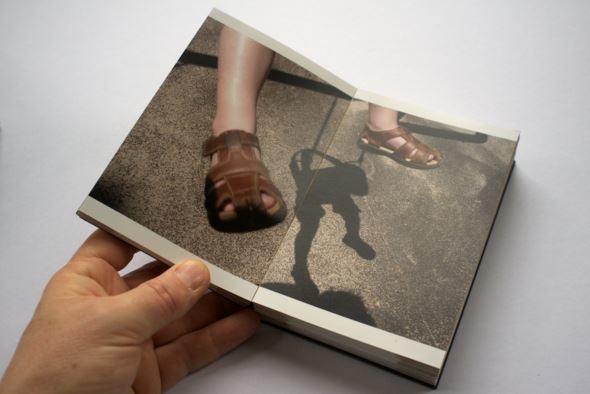
In the mean time, here is the finished book with my name hand written in silver. I may turn that inside out and put a sticker on it instead.


Comments are more than welcome. As is coffee.