
Easier than you think. Believe me!
Sole intention of this story is to learn nested routing.
ref: https://medium.com/geekculture/8801ac212fdf
SUMMARY of Story:
What is nested routing?
For React Js app architecture in detail refer:
https://saurabhshah23.medium.com/70b7b9103f22
What is nested routing?
Nested routing in react can be thought of multiple forward slash in the URL.
“www.organization.com/employees”
“www.organization.com/employees/:employeeId”
“www.organization.com/employees/:employeeId/projects”
“www.organization.com/projects/:projectId”
URL naming conventions I strongly recommend:
✓ lowercase only
✓ kebab-case/for-multi-word-url (use dash and not underscore or camelCase)
✓ For any reason, if you plan to change/rename a url, make sure the old url redirects to the new one. People bookmark, share, refer to it in some documents and you don’t want them to land on 404-not-found.
Why nested routing?
First and foremost, nested routing is essential for url sharing, dynamicity and SEO.
Easier than you think. Believe me!
Makes the further development and maintenance much easier.
You cannot keep creating a new url for every feature, sub feature.
You cannot keep doing prop-drilling for dependent data transfer.
Finally, why not?
My motive in this story is to focus on NESTED ROUTING only with example and coding.
With experience, it felt like implementing correct routing since beginning is very important to make your app truely versatile ♕
Advantages of Nested routing:
Very easy to implement.
No extra dependency.
URL sharing is enabled — One can reach directly to the desired page with desired data. (Think of sharing a page you see to someone remotely.)
This will automatically make sure the components and features are implemented to work independently. (This is how react dev is supposed to be ✌)
Disadvantages:
I literally don’t see any ツ
Other benefits:
Independent components means reusability.
Although, it does not mean data cannot be shared. Redux, context API are always there for use. Make sure to add checks like;
if (dataNotAvailable){
fetchFromAPI()
.then( proceed() )
} else{
localFetch()
.then( proceed() )
}
Code example and implementation:
Steps to build:
Basic react js app with index.js and App.js is simple.
In this example, I am using codesandbox. You can create a react app locally using following commands:
$ npx create-react-app my-app
$ cd my-app
$ npm start
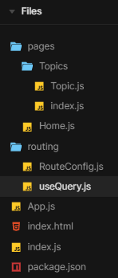
2. Create the above directory structure.
Add directories for routing and pages for separation of concerns.
I prefer this for ease of maintenance.
3. /routing
All the routes across the application will reside within /routing directory.
You can choose to create multiple files for sub-routes.
Authentication related stuff can also reside here.
Private route definitions/components, etc can reside here.
Here I have also added a custom hook for getting query parameters.
4. /pages:
All base pages / features of your app will reside here.
In this example, we have “/home” & “/topics” pages.
“/topics” will have further sub-pages as per the selection of topic.
Voila!!!
Here, we created multiple nested routes:
/home & /topics are nested under “/” root.
/:topicId is nested under “/topics”
You can create further nesting of routes as desired.
I personally recommend not to go more than 3 levels deeper for better user experience.
Nesting is mainly required when you have multiple navigators in your app; like:
Main navigation (usually Top navigation)
Side navigation (sub navigation based on the selected item in top-nav)
Sub-navigation if any.
Guidelines:
➤ Any dynamic data generated by the user like filters, sorting, etc should be passed as a “query parameter” and not as a react “url parameter”.
➤ In the above example, “topicId” was a url parameter whereas “timeStamp” was a query-parameter.
➤ url-param is only react specific, whereas query-param is universal.
References:
Best source is always the docs: React Router: Declarative Routing for React.js
Code sandbox: https://codesandbox.io/s/react-js-nested-routing-bkntv
https://docs.google.com/document/d/1hqj_ejysZahrfH3IBlOVhJEWribYDHCYyJ624y3quj0
