

There are three ways you can support your real-time lessons.
1. ROYAL MAIL
"Ok, done with Zoom for today. Now let's send each of my students an email with lesson material and extra practice. Sent. Uh, I forgot that great video they should really watch for our flipped classroom next week. Let's send another email. Uh, look, some learners turned their homework in. I should send them another email with feedback now. I was almost forgetting to check the Spam folder, last time I saw it, Sam's homework had been sitting there for weeks! And how's my student Matt doing? He's not handing in any work. I'll send him another email to see if he needs support (let's cc his parents too)".
I don't know how many students you have, but that looks like a lot of emails to me.
2. GOING WITH THE FLOW
"My Zoom meetings are enough. Homework is optional and I'll send it via chat. I'll check homework together with my student next lesson. I'm going to answer any questions and give feedback in real-time".
I think this is a good approach for one-on-one lessons only, and only if your students are happy to allocate 10-15 minutes of their (paid) time to go through all their homework each lesson, not just when they have a doubt.
3. BATCH PROCESSING
"My live lessons on Zoom are done for the day. I'll post today's lessons material together with homework on the class web page. One click and I'm done. Cool, the system has automatically checked homework! I'll just leave feedback on those creative writing tasks I assigned last week. [15 minutes later] Done. Time for tea."
Ta-dah, magic! I love this guy.
Well, that guy is using an LMS. In another post, I listed the essential apps for remote teaching. An LMS is one of them.
LMS, A DEFINITION
LMS stands for Learning Management System, it's the platform you should be using to manage your class. If Zoom, Skype and Google Meet are for real-time (or synchronous) online teaching, an LMS is for teaching with no real-time interaction (asynchronously). You can post videos, lesson material, create and track assignments, create project groups and you can even communicate with students via chat if needed. One tool for everything. Pretty cool, huh?
Google Classroom vs Edmodo
Many teachers and institutions use Google Classroom, it's probably the most famous free LMS out there. But I use and recommend Edmodo.
A quick comparison.
Price: Google Classroom is free, Edmodo is free.
Tools: They both offer the possibility to create manually or automatically-graded assignments and quizzes.
Integrations: Google Classroom provides integration with (so many!) third-party apps and websites. Edmodo is more essential, it provides integration with Office Suite - but still offers everything you really need to supplement your live lessons.
Registration requirements for teachers: Teachers need a Gmail account to use Google Classroom. Teachers can use any email provider with Edmodo.
Email account requirements for students: Your students need a Gmail account to use Google Classroom (ouch)*. Your students do not need any email account with Edmodo (yay!).
* To be fair, yesterday I learnt that if students have a different email provider, they can still join your class on Google Classroom but the shortest video tutorial I found was 19-minute long and that really put me off, so my comment 'ouch' stays there.
Parent accounts: Google Classroom does not allow the creation of an account for parents, they'd still have to log in using their child's credentials. On Edmodo you can create a Parent Account - if you think it's necessary.
Community support: There are so many support groups and training webinars to learn how to use Google Classroom. There are very few to learn how to use Edmodo (because guess what, it's so intuitive you won't need any, and this post will get you started anyway).
Benefits of using Edmodo
(Some of the things listed here apply to LMSs in general, in case you choose another provider).
Privacy. Your students can send you messages and homework without the need for you to share your personal contact details with them - or with their parents - and vice-versa.
You can create manually or automatically-graded quizzes directly from your LMS without having to find, register and set up another platform (e.g. Quizlet, Kahoot, Quizziz...)
If you have lots of students and classes, you can manage coursework and assignments from one platform only, making the whole process quicker. More time for tea, you know?
You can post your live lesson's material there for future reference, independent study and revision.
You and your students can post anything there (text, pictures, videos, documents, links to third-party websites), which is great for a flipped-classroom approach or when assigning creative tasks students can do in their own time.
The material and assignments you post stay saved there in chronological order. Edmodo's layout is similar to Facebook's feed so the LMS acts as a digital notebook for both you and your students.
You can create groups, assign group projects, or students can leave comments on each other's work, which encourages peer correction and strengthens connections between students, no matter where they are in the world.
You can even create a live session - like on Facebook. Students won't be able to participate actively like in a Zoom meeting, but they can ask you questions in real-time by writing in the comment box.
Edmodo works on any device, mobile phones too! This is important in case some of your students don’t have access to a laptop.
CONTENT OF THIS GUIDE
In this post we'll look at how to:
create teacher and student accounts
create a class
let your students join your class
post different material types
embed videos
create automatically-graded quizzes
Each short tutorial includes some screenshots to guide you.
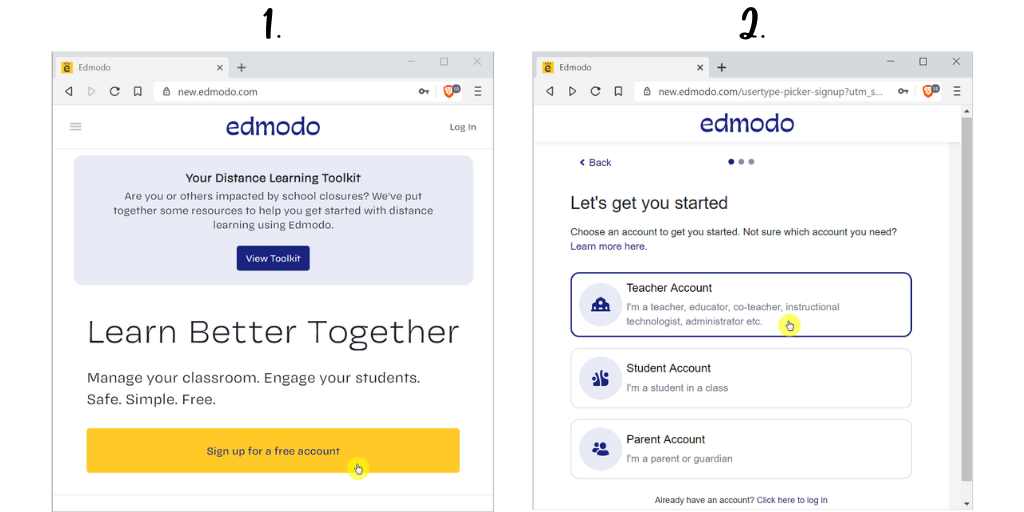
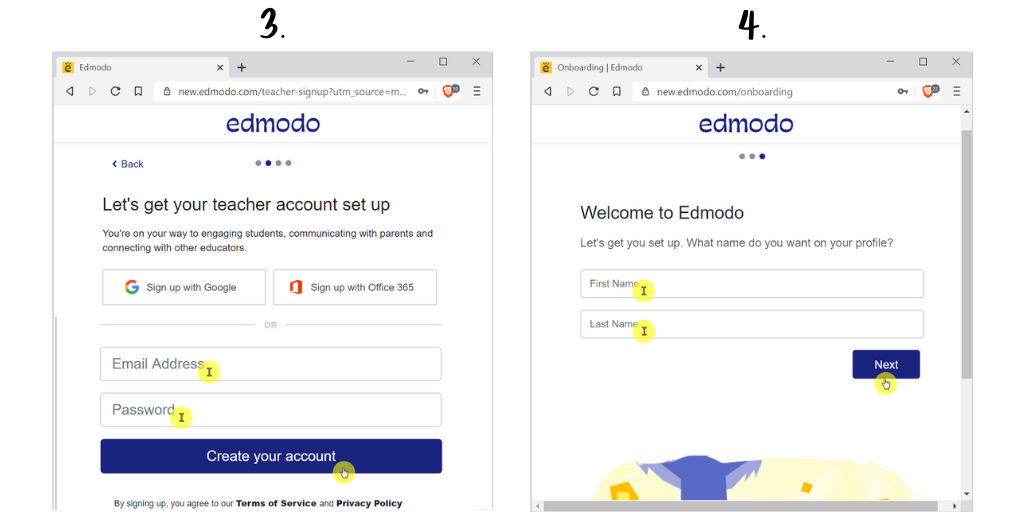
Create a teacher account and your first class
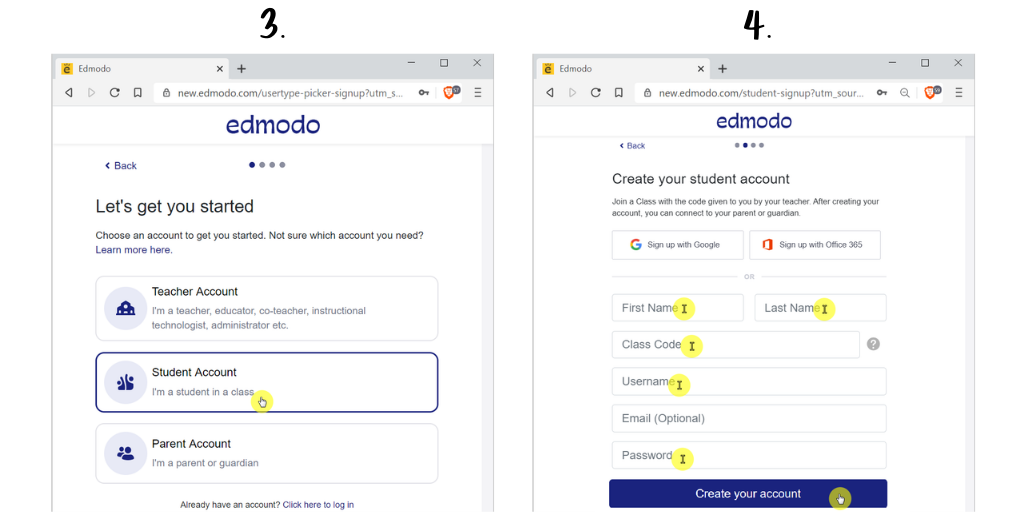
To create a teacher account go to Edmodo.com and click ‘Sign up for a free account', then click ‘Teacher Account’ and follow the instructions.
The procedure is quite self-explanatory but the pictures below show you a preview of what you’ll see.
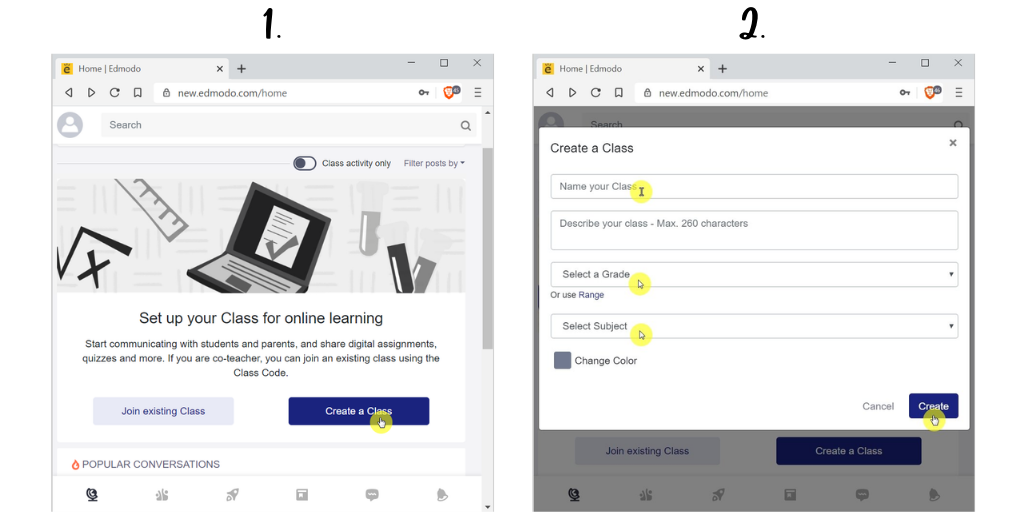
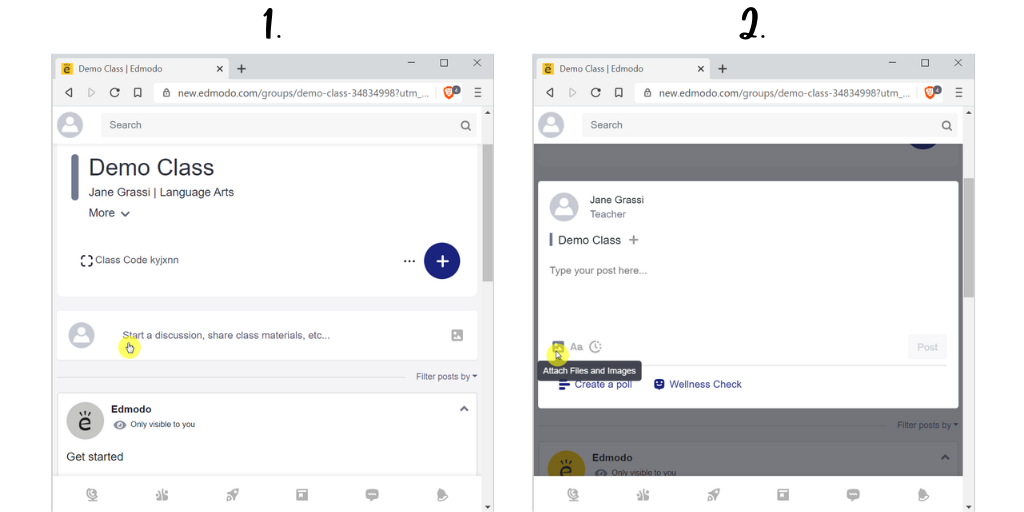
The signup process also lets you create your first class in a matter of seconds. You can add a class name, a description (optional), a grade (I usually select ‘none’), a subject and a colour for your class (my privates are yellow and my school lessons are blue for example).
Demo:
Shortcuts
SEE YOUR CLASSES
Let’s assume you’ve already created your teacher account on Edmodo.com and you are now logged in. To view, access, edit your classes and create new ones, click on the ‘high-five’ icon.
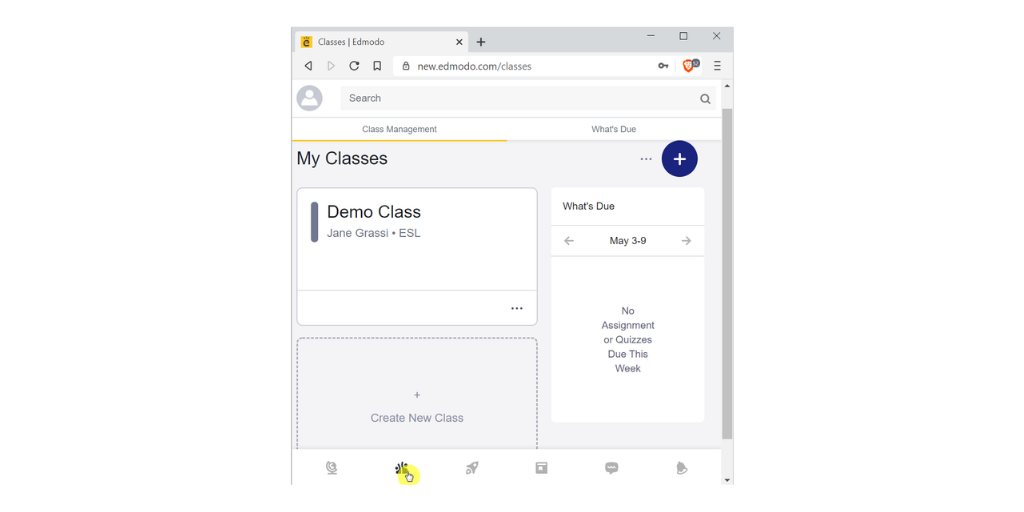
This will open the My Classes page. From here you can enter any of your classes’ feed or create a new class.
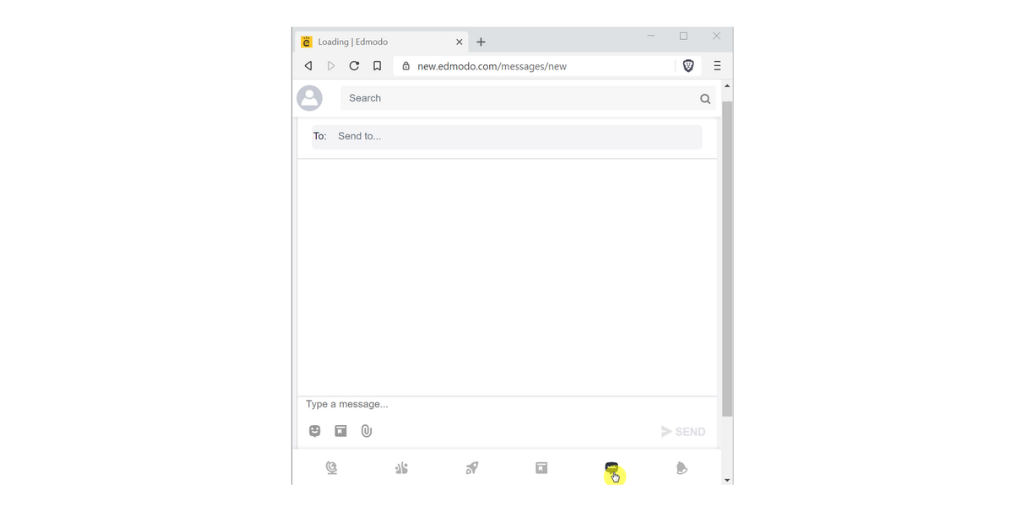
SEND PRIVATE MESSAGES
Another important icon is the ‘speech bubble’. Clicking on it will direct you to your Edmodo inbox. From there you can send private messages (+ attachments) to a student or parent. Your students and their parents have that same icon on their Edmodo page so they can send you messages if needed - no need to share your phone number!
Add students to your class
Each class has a unique joining code you can see below your class’ name.
Share the class code with your students, they’ll need it when they create their Student Account.
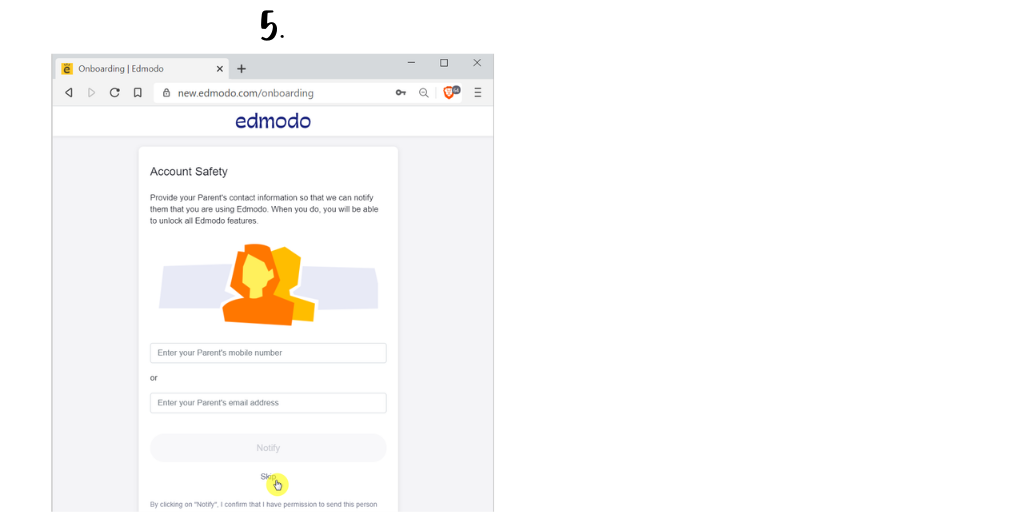
To create a Student Account, students should go to Edmodo.com, click ‘Sign up for a free account’, choose ‘Student’ and follow the (very quick) procedure. An email address and parents' permission are optional.

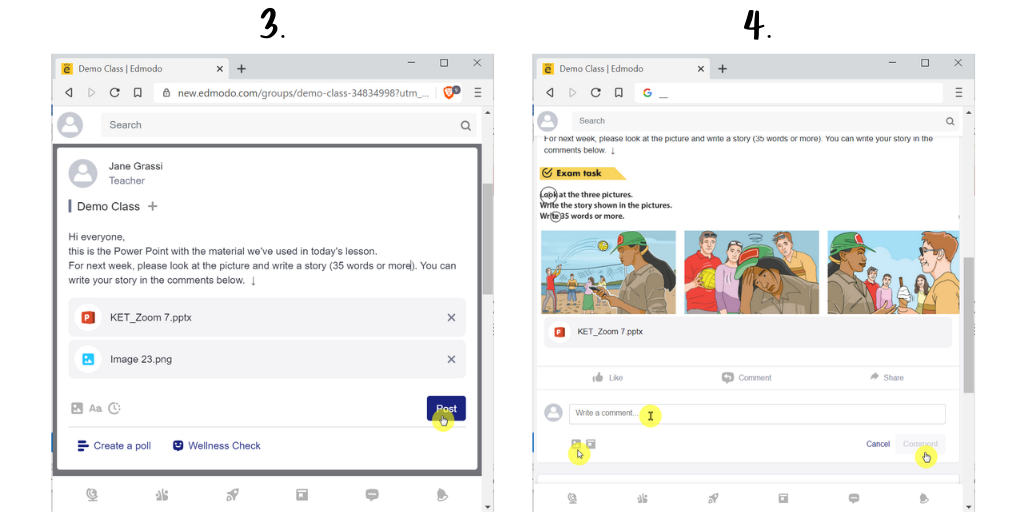
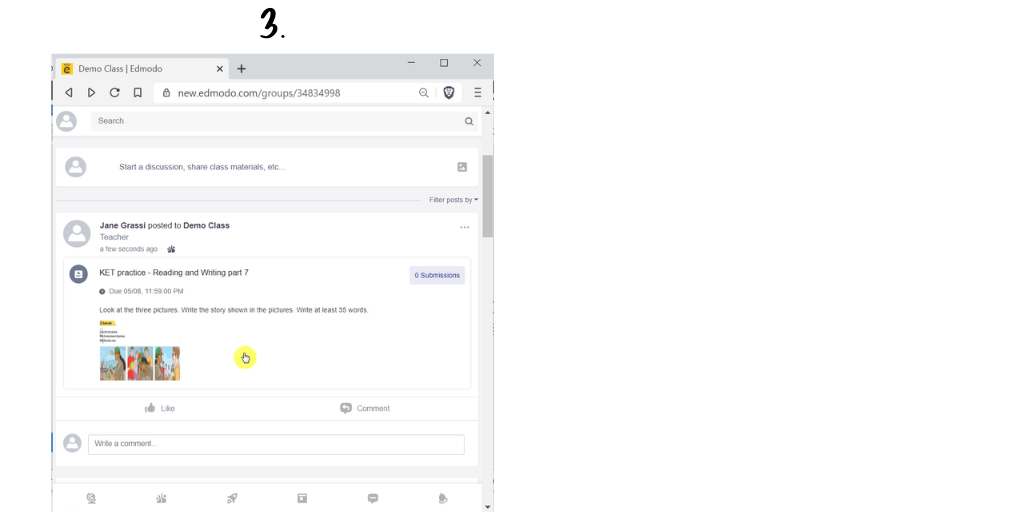
Post material and check homework
Unlike with emails, the benefit of having an LMS is that you’ll need to post material only once and all your students in that class will be able to see it. In case you are wondering: yes, you could do the same thing sharing a folder on your drive but how will you make sure students can easily add content? Or leave comments? Or send you messages? And how will you track their progress? That folder will soon get very messy, trust me.
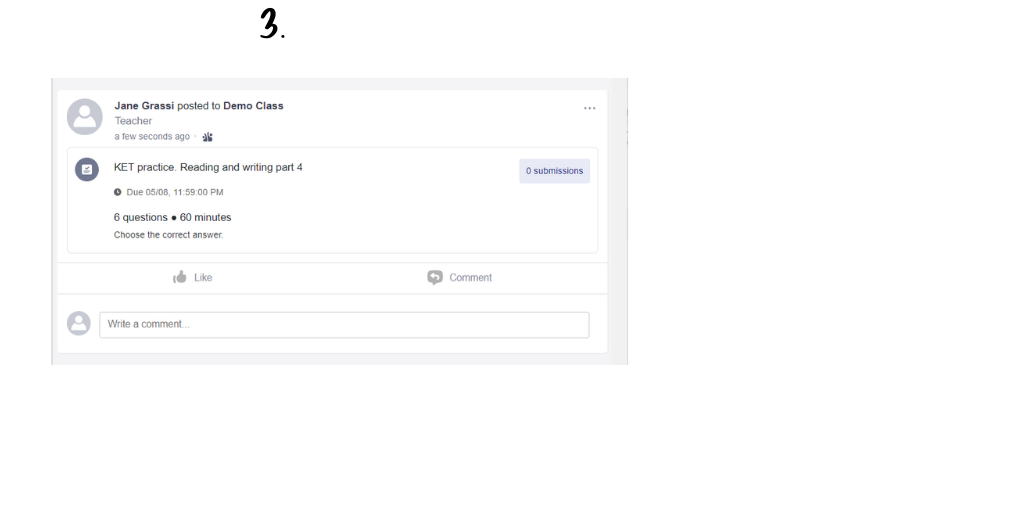
Edmodo works like Facebook: you create a post, attach a file if needed, and publish it.
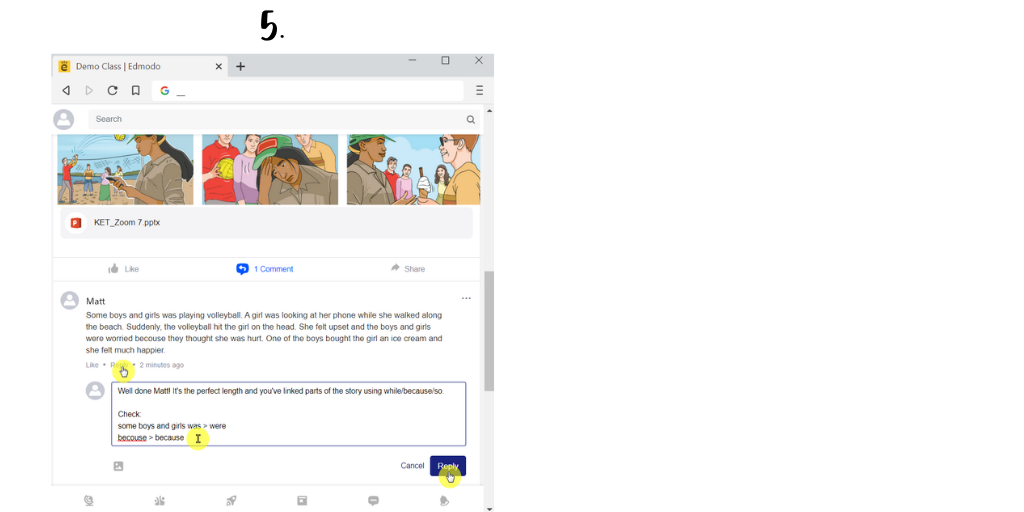
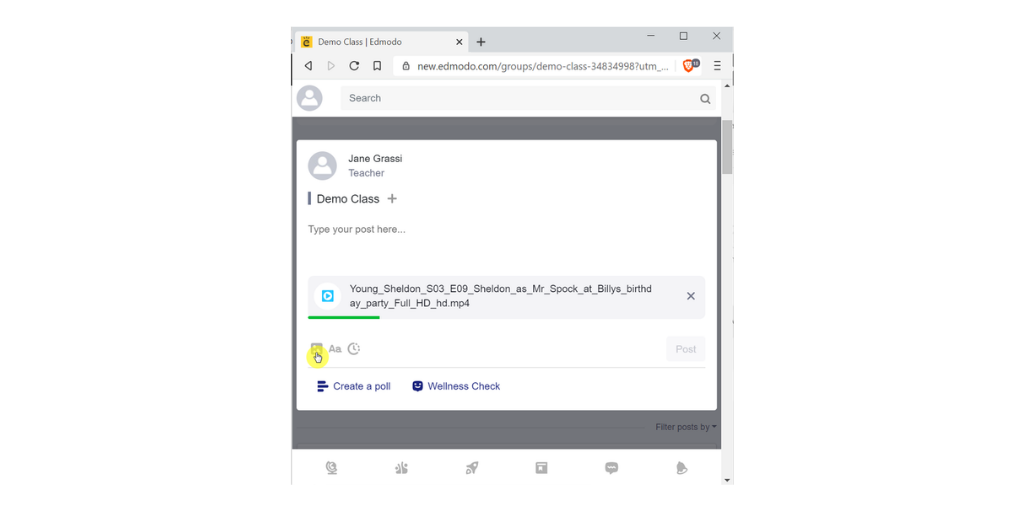
Tip! When I’m not creating a quiz or assessing my students formally, I like for them to write their answers directly in the comments. This is a good option because students can read, see and comment on each other’s work, thus learning from each other’s mistakes and good answers. I leave my feedback by clicking ‘reply’ below each student’s comment.
SHARE VIDEOS
In the example above, I posted a picture and a PowerPoint presentation. But you can also publish videos.
Option A. Attach a video file
If you have a video saved on your computer, make sure it’s in mp4 format, then attach it by clicking on the square icon. Videos are normally large in size so it does take a while for them to upload.
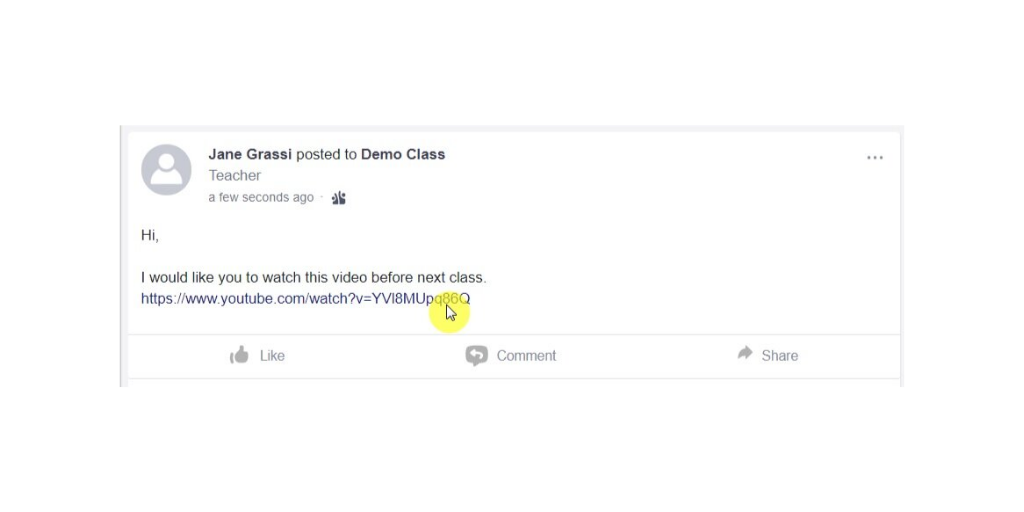
Option B. Paste a URL link
If you want your students to watch an online video, you could post the url link. With this option the video will open in another window though.
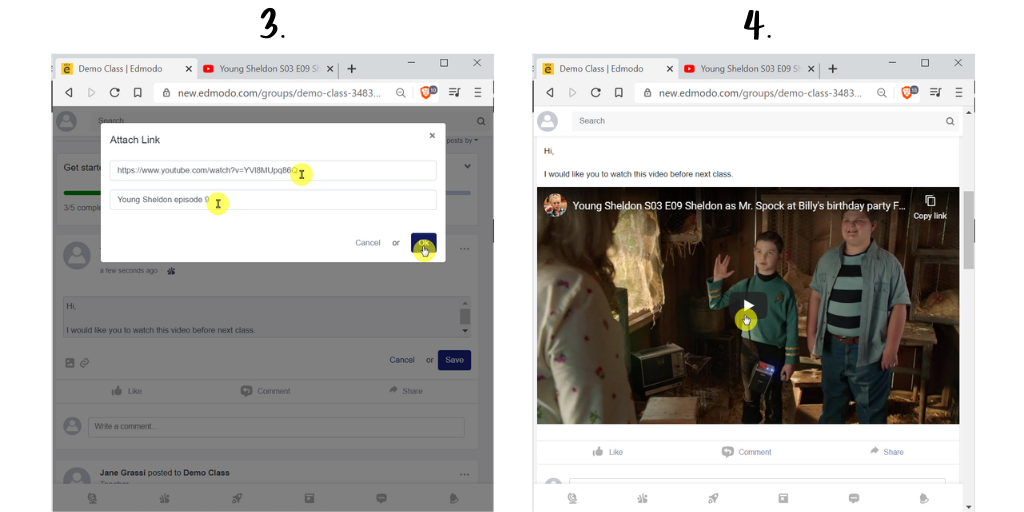
Option C. Embed an online video
If you want to share a video but you want your students to watch it without leaving Edmodo, this is the option for you.
Create and publish a post. Then click Edit, click the Link icon and paste the video url.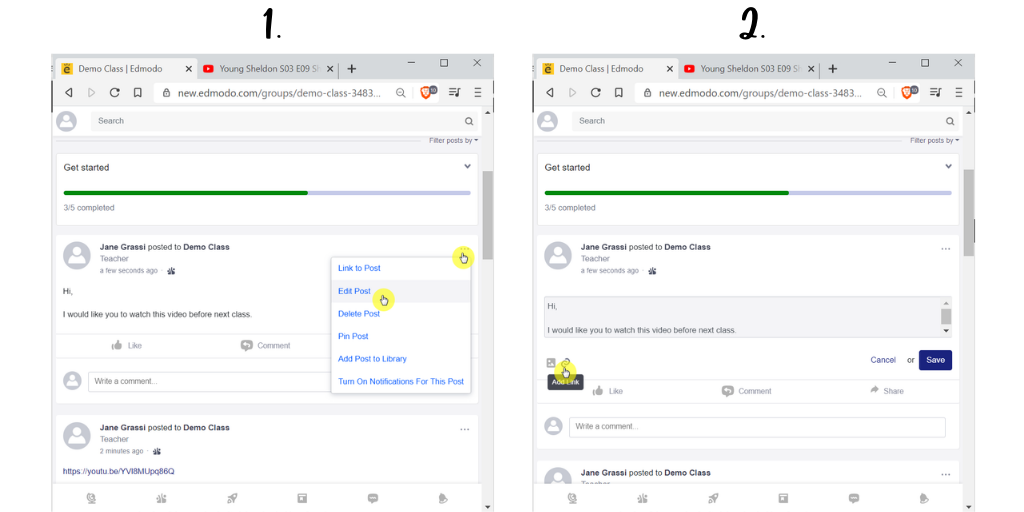
CREATE AN AUTOMATICALLY-GRADED QUIZ
The cool thing about Edmodo (and many LMSs) is that you can create and assign quizzes without having to rely on a third-party platform (such as Quizlet, Kahoot, Quizziz…). The system will even track your students’ progress automatically. To learn about the benefits of using fewer apps you can read this post.
To create a quiz
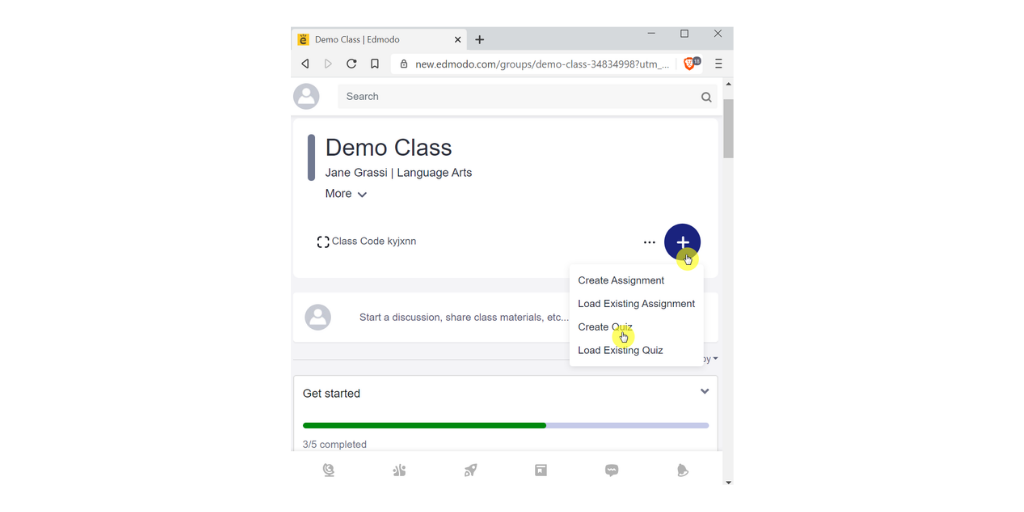
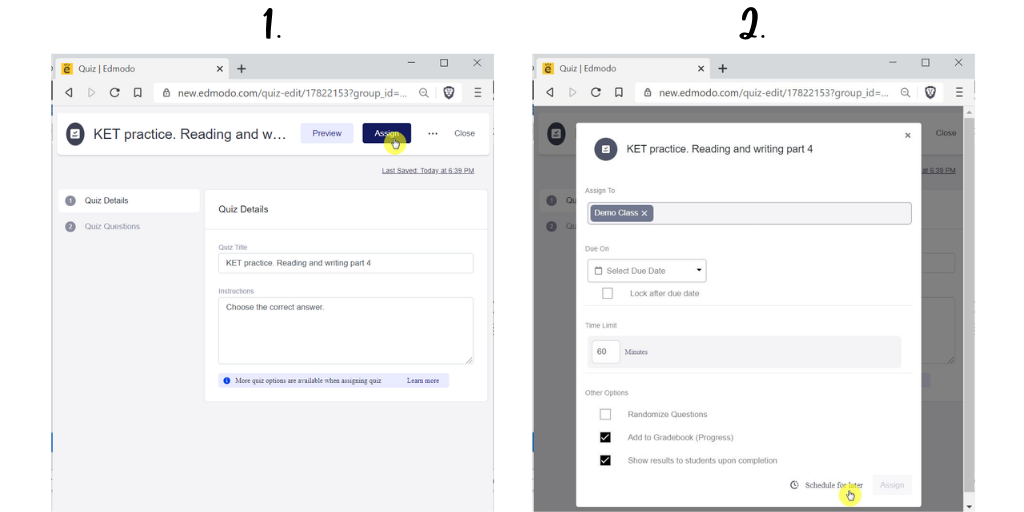
Click on the big + button on the class’ page.
Give your quiz a title (e.g. “KET exam practice - Reading and writing part 4”).
Add instructions (e.g. “Read the text and choose the correct answer”).
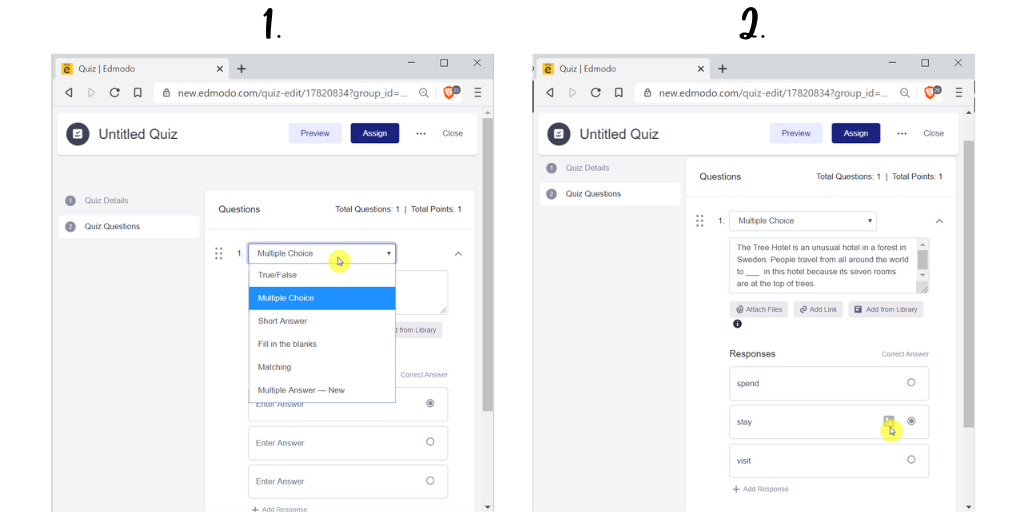
To add questions
Choose the question type (Multiple choice, Multiple answers, True/False, Short answer, Fill in the blanks, Matching).
write your questions and your answers. Yes, you can attach pictures/links/documents if needed.
Preview the quiz.
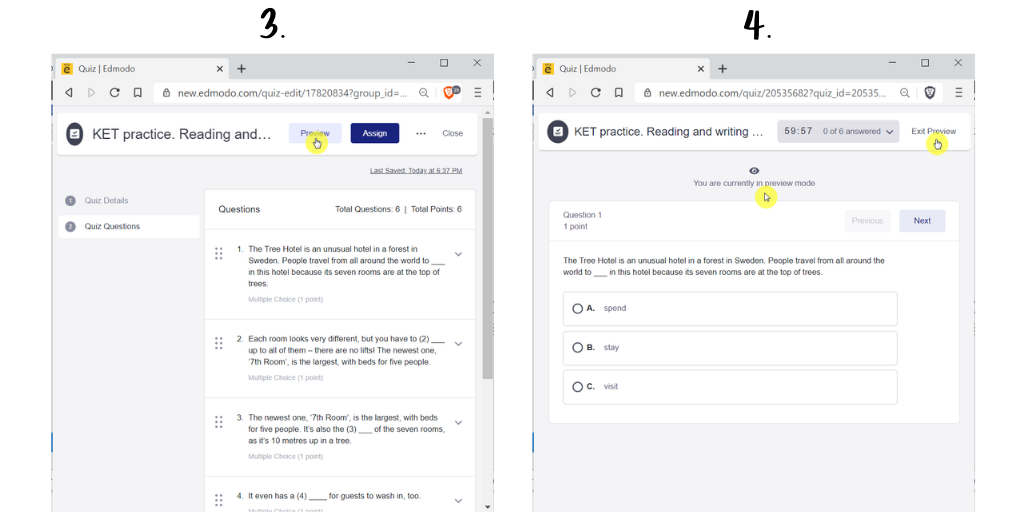
To assign your quiz
Click on the blue button Assign.
The system lets you choose a due date (you can even lock the quiz after that), you can set a time limit for task completion, randomise questions, show/not show students correct answers upon completion, track progress.
You can assign your quiz straight away or schedule it for a later date.
CREATE AN ASSIGNMENT
Creating an assignment is very similar to creating a quiz.
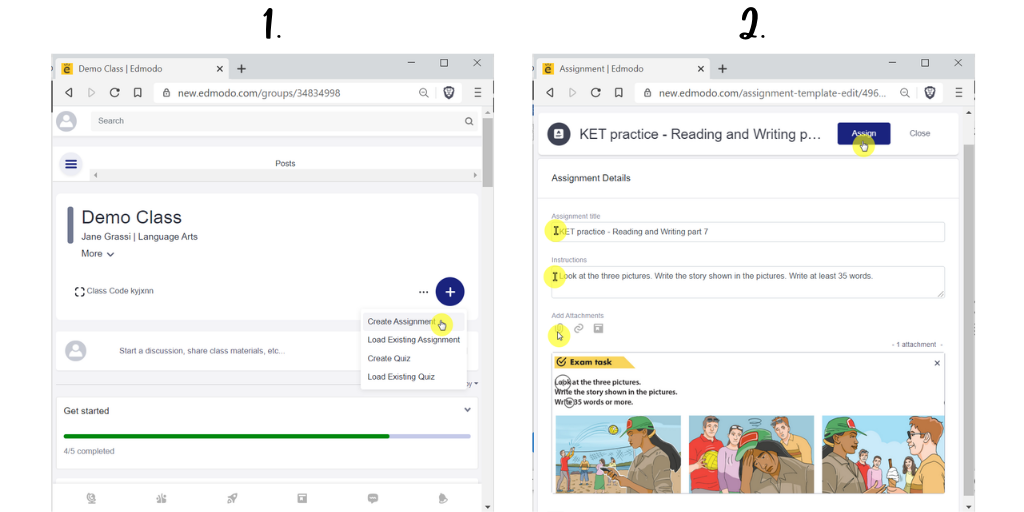
Click on the big + button on the class’ page.
Give your assignment a title.
Add instructions.
Attach files, pictures or links if needed.
As I said, I use this option only when assessing my students formally. I usually create a normal post and ask learners to leave their answers in the comments.
CONCLUSIONS
In this post, we had a look at why it’s very important to have an LMS when teaching. Almost essential when teaching remotely.
We quickly compared two famous platforms - Google Classroom and Edmodo - and we got started with the basics of using Edmodo.
The basics will (and should!) be enough for most teachers but if you need help with doing something a bit more advanced you can always check Edmodo’s support page or contact me via DM.
And now some questions for you:
How will you and your students use your LMS creatively?
Will you start group projects, peer-correction tasks, conversations?
Will you start posting material to implement a flipped classroom approach?
Will you use it to replace other platforms and tools? Maybe you won’t be needing to share a folder on the cloud anymore, or to use your email, or to set up Kahoot and Quizlet, or to pay for a Padlet pro account. Fewer tools = less pain for your students and for you.
Will you use it together with Zoom when setting up Breakout Rooms? Check this post for ideas.
Will you use it in combination with other tools and websites you love? I let my students use Vocaroo for example for speaking practice or I sometimes post links to some great ready-made quizzes and activities on the British Council and Cambridge’s websites (which do not need registration or codes).
I’d love to hear your answers to the questions above, you can write a comment below.
Credits
KET tasks used for the demo are from the book Compact Key for Schools 2nd Edition, Cambridge University press (SB p.52 and WB p. 34)
Video used for the demo is from HD Sitcom Lover’s Youtube Channel
Photo created by Tirachards on Freepik.com